The aroma of freshly baked cookies wafts through the air, tickling your senses and drawing you into the kitchen like a moth to a flame. Imagine sinking your teeth into a soft, chewy cookie decorated with vibrant pastel colors that scream “spring!” Those delightful morsels are none other than Easter Blossom Cookies—perfect for celebrating the season with friends and family.
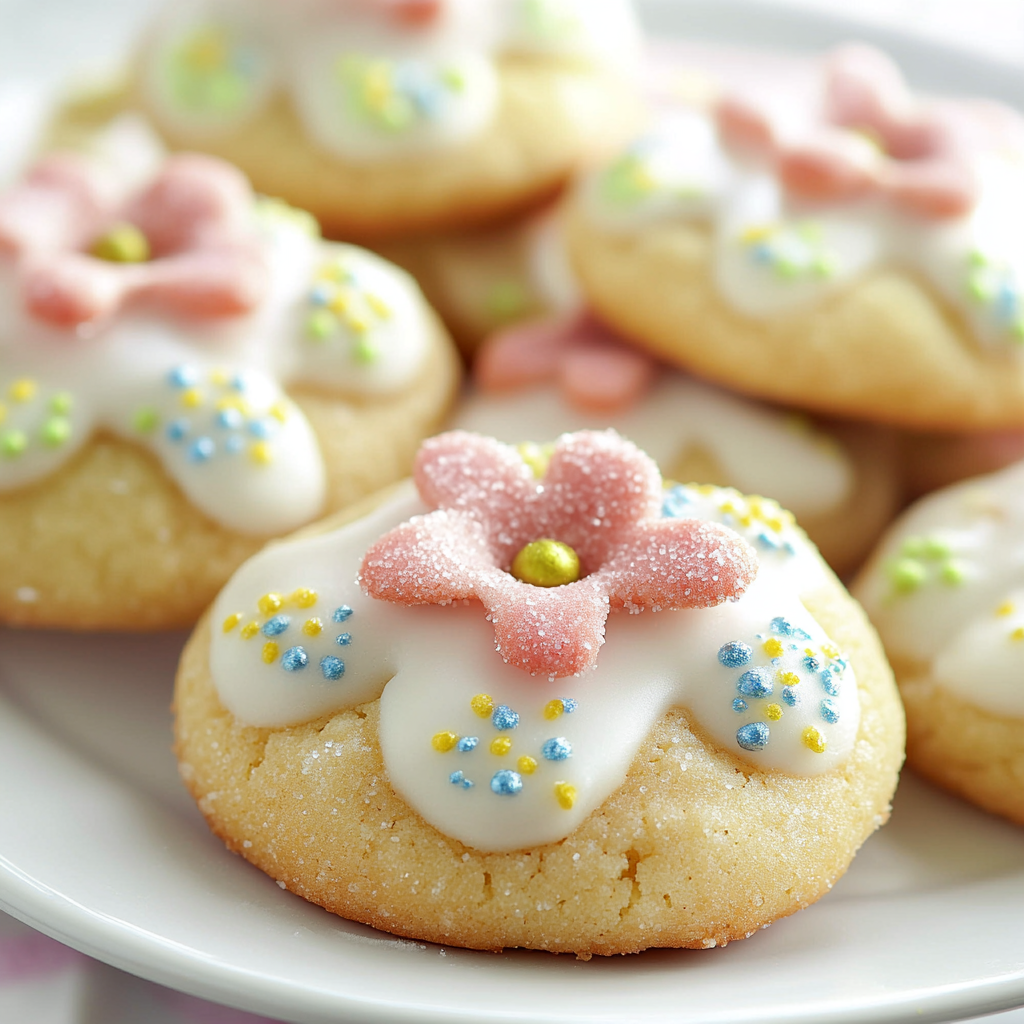
Close your eyes for a moment. Picture yourself surrounded by loved ones, laughter filling the room as you share these lovely treats. Each bite is a blend of buttery goodness and sugary sweetness that dances on your taste buds. Trust me; these cookies will have everyone asking for seconds (and thirds).
Why You'll Love This Recipe
- These Easter Blossom Cookies are incredibly easy to prepare and offer a delightful burst of flavor
- Their eye-catching colors make them a showstopper at any gathering
- Feel free to customize them with toppings based on your preferences
- They’re perfect for both kids and adults alike!
Baking these cookies has turned into a beloved tradition in my household. I remember one Easter when my kids went wild decorating each cookie with sprinkles as if they were Picasso wielding frosting instead of paint!

Essential Ingredients
Here’s what you’ll need to make these delicious cookies:
- All-Purpose Flour: The base of our cookies; make sure to sift it to avoid lumps.
- Granulated Sugar: Sweetness is essential; opt for fine sugar for an even texture.
- Baking Powder: A crucial ingredient that makes our cookies rise beautifully.
- Salt: Just a pinch enhances all the flavors; don’t skip it!
- Unsalted Butter: Bring this to room temperature for easy mixing and a rich taste.
- Eggs: Large eggs work best; they add moisture and bind everything together.
- Vanilla Extract: Opt for pure vanilla extract for an aromatic boost in flavor.
- Food Coloring: Use pastel shades to create visually appealing cookies.
- Sugar Sprinkles or Colored Sugar: For that final touch of whimsy!
The full ingredients list, including measurements, is provided in the recipe card directly below.
Let’s Make it Together
Prepare Your Workspace: Start by preheating your oven to 350°F (175°C). Line baking sheets with parchment paper—you’ll thank me later when it’s time to clean up.
Create the Dough: In a large bowl, cream together the softened butter and granulated sugar until light and fluffy. This should take about 3-4 minutes!
Add Wet Ingredients: Beat in the eggs one at a time, followed by the vanilla extract. The mixture should be smooth and creamy—like a warm hug on a chilly day!
Sift Dry Ingredients Together: In another bowl, whisk together flour, baking powder, and salt. Gradually incorporate this dry mix into your wet ingredients until just combined.
Add Color to Your Cookies: Divide the dough into smaller bowls based on how many colors you want. Add food coloring one drop at a time until you reach your desired hue—make it fun!
Scoop & Roll: Using a tablespoon or cookie scoop, roll small balls of dough and then roll them in sugar sprinkles before placing them on the prepared baking sheets. Give each ball some space—they need room to bloom!
Bake & Cool: Place them in the preheated oven and bake for 10-12 minutes until they’re lightly golden around the edges but still soft in the center. Let them cool slightly before transferring them to wire racks.
Enjoy every moment as you watch these colorful delights come together!
And there you have it—the perfect recipe for making delightful Easter Blossom Cookies that will brighten up any celebration while delighting taste buds everywhere!
Content
Tip: Use room temperature ingredients for a smoother dough. Cold butter can lead to lumpy cookies. I learned this the hard way when my first batch resembled cookie dumplings.
Tip: Chill your dough before baking for perfectly shaped cookies. It prevents spreading, ensuring those beautiful blossom shapes hold up. The first time I skipped this, I ended up with a cookie sheet of pancake-like blobs.
Tip: Experiment with different sprinkles on top for varied flavors and colors. One Easter, I used lavender sprinkles, and they were a hit! Who knew cookies could double as art?
Perfecting the Cooking Process
Start by preheating your oven and preparing your baking sheets. Mix wet ingredients first, then add dry ones in stages for perfect blending. This method reduces clumps and ensures an even texture throughout.

Add Your Touch
Feel free to swap out vanilla extract for almond or lemon zest for a tangy twist. You can also add chopped nuts or dried fruit for extra texture and flavor variations that surprise your taste buds.
Storing & Reheating
Store cookies in an airtight container at room temperature to maintain freshness. If they last long enough, reheat them briefly in the microwave to restore their original warmth and chewiness.
Chef's Helpful Tips
- For consistency, always measure flour accurately using the spoon-and-level method
- Avoid pressing it directly from the bag; it packs too tightly!
- Try adding a pinch of salt to enhance the sweetness of your Easter Blossom Cookies
Every Easter, my family gathers around the table fighting over who gets the last Easter Blossom Cookie. That competition has sparked many cherished memories filled with laughter and crumbs!

FAQ
What are Easter Blossom Cookies made of?
Easter Blossom Cookies consist of basic ingredients like flour, sugar, butter, eggs, and chocolate kisses.
Can I make these cookies gluten-free?
Absolutely! Substitute regular flour with gluten-free flour blends for delicious results without gluten.
How long do these cookies stay fresh?
Stored properly, Easter Blossom Cookies can stay fresh for up to one week at room temperature.

Easter Blossom Cookies
5 Stars 4 Stars 3 Stars 2 Stars 1 Star
No reviews
- Author: Emma
- Total Time: 27 minutes
- Yield: Approximately 24 cookies 1x
Description
Easter Blossom Cookies are a vibrant, buttery treat adorned with colorful sprinkles, perfect for celebrating spring with family and friends. Enjoy these delightful cookies at your next gathering!
Ingredients
- 2 ¾ cups all-purpose flour
- 1 cup granulated sugar
- 1 tsp baking powder
- ½ tsp salt
- 1 cup unsalted butter, softened
- 2 large eggs
- 1 tsp vanilla extract
- Food coloring (pastel shades)
- Sugar sprinkles or colored sugar
Instructions
- Preheat your oven to 350°F (175°C) and line baking sheets with parchment paper.
- In a large bowl, cream together the softened butter and sugar until light and fluffy (about 3-4 minutes).
- Beat in eggs one at a time, followed by the vanilla extract until smooth.
- In a separate bowl, whisk together flour, baking powder, and salt. Gradually add this to the wet mixture until combined.
- Divide the dough into portions and mix in food coloring to achieve desired hues.
- Roll small balls of dough in sugar sprinkles, then place them on the prepared baking sheets, spacing them apart.
- Bake for 10-12 minutes until lightly golden around the edges but soft in the center. Cool slightly before transferring to wire racks.
- Prep Time: 15 minutes
- Cook Time: 12 minutes
- Category: Dessert
- Method: Baking
- Cuisine: American
Nutrition
- Serving Size: 1 cookie (28g)
- Calories: 130
- Sugar: 8g
- Sodium: 50mg
- Fat: 6g
- Saturated Fat: 4g
- Unsaturated Fat: 2g
- Trans Fat: 0g
- Carbohydrates: 18g
- Fiber: 0g
- Protein: 1g
- Cholesterol: 20mg

